This article is part of a much more detailed free ebook for Apple Search Ads Advanced.
A Practical Guide to Apple Search Ads Advanced Setup (and bonus free ebook)
Last updated: Jan 29, 2024
Note: You should go through this short glossary to understand the terms used in this article. I sometimes refer to "Apple Search Ads Advanced" as ASA to make it easier for you to read. This guide is only about Apple Search Ads advanced, not the Basic platform.
When you should NOT use Apple Search Ads Advanced
Let's start with a few scenarios when you should NOT use Apple Search Ads Advanced.
-
Your app doesn't have monetization of any kind, whether it's a subscription, paid app, in-app purchases, or in-app ads. ASA is an expensive endeavor. You need to have app monetization of some kind to support your ASA campaigns.
-
Your app/screenshots are not polished, you don't know who your target audience in the app store is, and you have no idea what they might search for.
-
Your app doesn't have at least basic App Store Optimization (ASO) and you don't know what ASO is.
-
Your app installs are not converting into monetization, even with regular organic downloads. There is little benefit in running Apple Search Ads if that's the case. You'd need to fix this issue within your app first.
The only exception is if you've just launched a newish app and are somewhat confident in the above points and have some budget that you can experiment with. You also get a one-time $100 free credit if you are eligible when you first sign up for Apple Search Ads Advanced. Use it wisely by optimizing your app as much as you can before diving into ASA. If your ASO is lacking, you can also utilize ASO tool in the SAO platform for your app.
The goals/objectives of an ideal ASA campaign should be as follows -
-
The main goal is to generate revenue of some kind over time from the resulting downloads, whether it's from subscriptions, in-app ads, or in-app purchases.
-
A meaningful uplift in organic keyword rankings in the countries where you are running ASA campaigns. An unofficial consensus is that running ASA campaigns usually results in improved organic keyword rankings for the app, which I've also noticed many times. It's debatable if it's because of increased downloads and/or if Apple actually uses metrics from ASA for your app in the Appstore search algorithm.
It is not uncommon for some successful apps to use ASA mainly to keep up the organic keyword rankings in the app store. In the end, the revenue they generate over time is much more than what they spend on ASA in the short term.
Important preparation before the ASA campaigns are setup
Before you set up your first set of campaigns, I can't emphasize enough how important it is for you to go through this section.
Gather all the relevant keywords, including some combinations of keywords, that are relevant to your app
You should save all these keywords separated by commas somewhere like a text file where you can easily copy and edit them.
Stick to only "Search Results" type of campaigns.
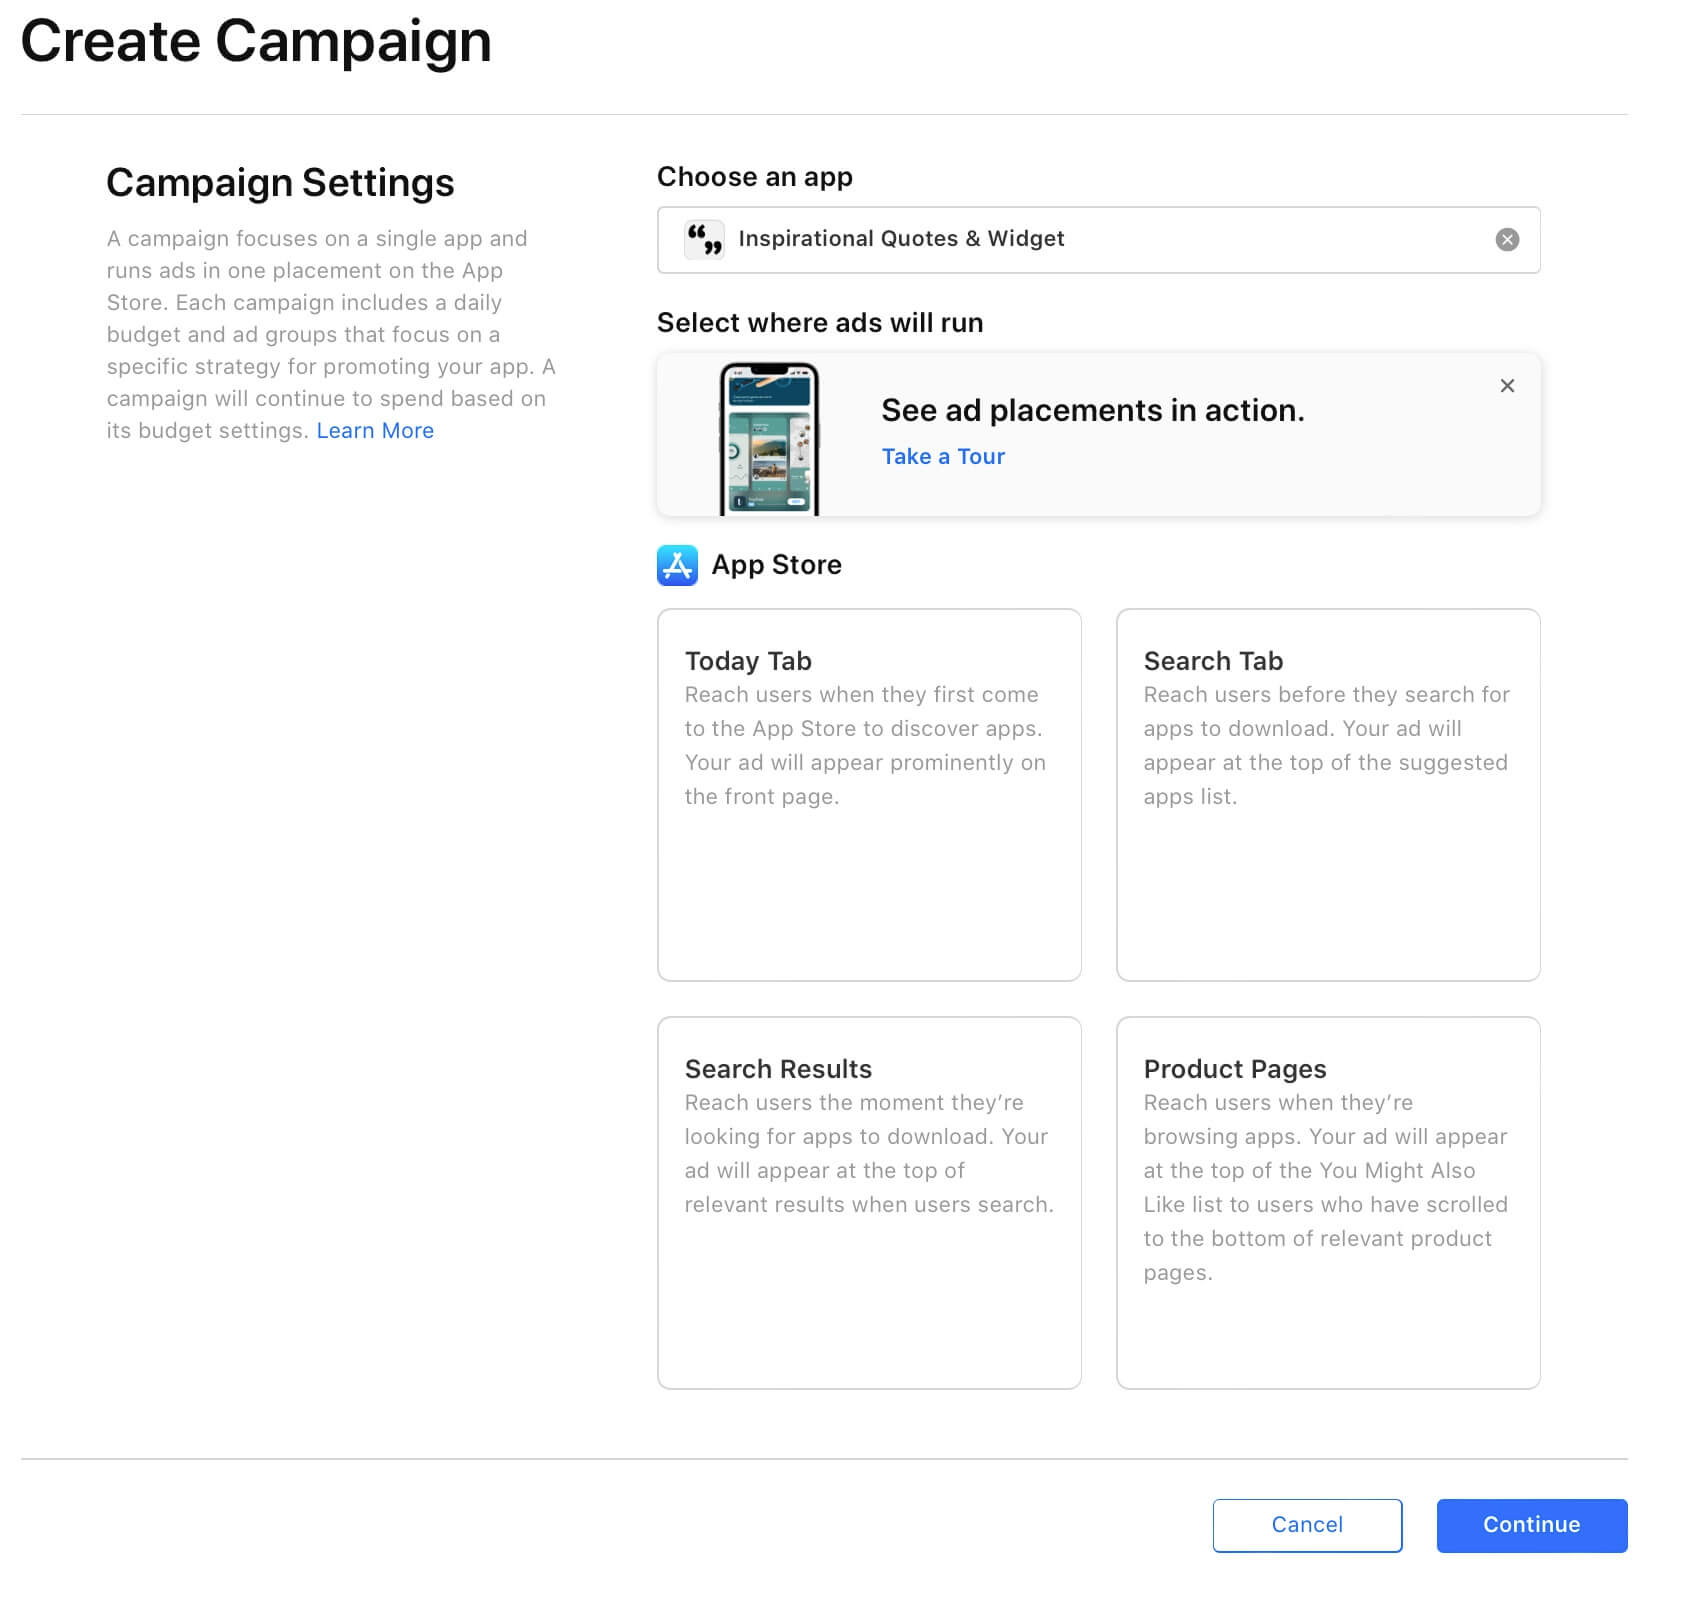
In short, there are four types of campaigns in ASA, out of which only one type of campaign, "Search Results" gives you the most bang for the buck. These are the ads that show up when a user searches for a keyword. All other types of campaigns are mainly for brand awareness, not for revenue generation. It's similar to how the Coca-Cola company runs TV ads for brand awareness. Unless your app is already in the top charts and/or your app is well recognizable because of its popularity, you should only stick to "Seach Results" campaigns.
If you want to learn more about different campaign types, you can go through the official documentation to learn about the four campaign types.
Decide on a very few countries in which you'll be running your ASA campaign.
At least in the beginning, you should choose very few "Tier 1" countries from the list of the US, UK, Australia, Canada, Germany, France, Austria, Belgium, Hungary, Sweden, Switzerland, Norway, Italy, Netherlands and Finland, etc.
It's better to have that uplift concentrated in a very few countries instead of spreading it thinly across many countries. In the app store, each country is its own ecosystem, and whatever organic keyword ranking improvement in Country A may not reflect in Country B. I recommend starting with fewer than three countries.
Decide on the daily budget
Decide on a daily budget that you are comfortable with and that can last for at least 10 to 14 days. Hopefully, after a couple of weeks of ASA campaigns, you should have some data and results that can guide your next steps. I recommend setting a lower daily budget in the beginning because you can always increase it later, depending on your results.
Understand the nature of Apple's bid suggestions/recommendations.
This is one of the pitfalls a lot of app developers fall into. Do not just increase the bids blindly according to Apple's bid recommendations.
What Apple is trying to do is give some kind of an approximate suggestion metric based on the app's category and competitors' bids which are often updated less frequently. You can usually get decent results even with bids that are way lower than the bid recommendations.
Structuring Apple Search Ads campaigns
If you haven't already created an Apple Search Ads account, you can follow this process from this documentation You might need to finish setting up your billing and linking your App Store Connect if it's your first time creating an ASA account.
Unless you are an agency, you should only use one campaign group when setting up the first time, and all of your campaigns should be under this campaign group.
In Apple Search Ads, you generally create a campaign and then an ad group belonging to the campaign. You'll be specifying the daily budget and countries at the campaign level. And you'll be adding keywords along with the bids at the ad group level.
The names you choose for the campaign and ad group don't matter. My advice is not to change the names of campaigns and ad groups unless you have a strong reason because it's a little hard to link revenue to the campaign and ad group names later on.
You should never delete campaigns, ad groups, and keywords. Instead, you can just "pause" them. It's important to have data and metrics for these later on, even if you've paused them.
The initial setup involves the creation of two "Search Results" campaigns. I personally call them "Primary Campaign" and "Discovery Campaign". The primary campaign will be your bread and butter that drives revenue and hopefully organic keyword ranking uplift for your relevant keywords. You should be allocating at least 75% of your daily budget to the primary campaign.
The "Discovery campaign" acts as a real-world keyword discovery mechanism. Most likely, there won't be much revenue generated from this type of campaign. However, if you do get some revenue from this campaign, it's just icing on the cake. You typically allocate the remaining leftover budget to the discovery campaign. You do have an option to not even bother about a discovery campaign. However, I strongly recommend creating the discovery campaign because of a few reasons. The nature of the app store changes frequently, what I mean by this is there will always be changes in the trends/popularity of your relevant keywords. It's essential to find these trends, new keywords, and a combination of keywords that might work great for you from the discovery campaign. If you do find them, you should move this new keyword to the primary campaign.
Now it's a good time to learn about three types of keywords in Apple Search Ads. "Exact Match", "Broad Match" and "Negative" keywords. Negative keywords can be of either Exact or Broad type. You can learn more about this in the official documentation.
While we will be using the same set of keywords in both primary and discovery campaigns. We will be using Exact match type keywords in the primary campaign and Broad match type keywords in the discovery campaign. Additionally, we are going to add negative Exact keywords to the discovery campaign, because Broad match keywords can include Exact keywords as well. By doing this, Apple Search Ads can generate potential new keywords in the discovery campaign for your app.
Step-by-step process of setting up your first two ASA campaigns
Let's walk through the step-by-step process of setting up your initial ASA campaigns, both primary and discovery. I'll be using my ASA account for screenshots where I'll be blurring sensitive information. I'll also explain in depth of what settings we are using and the reasons behind them.
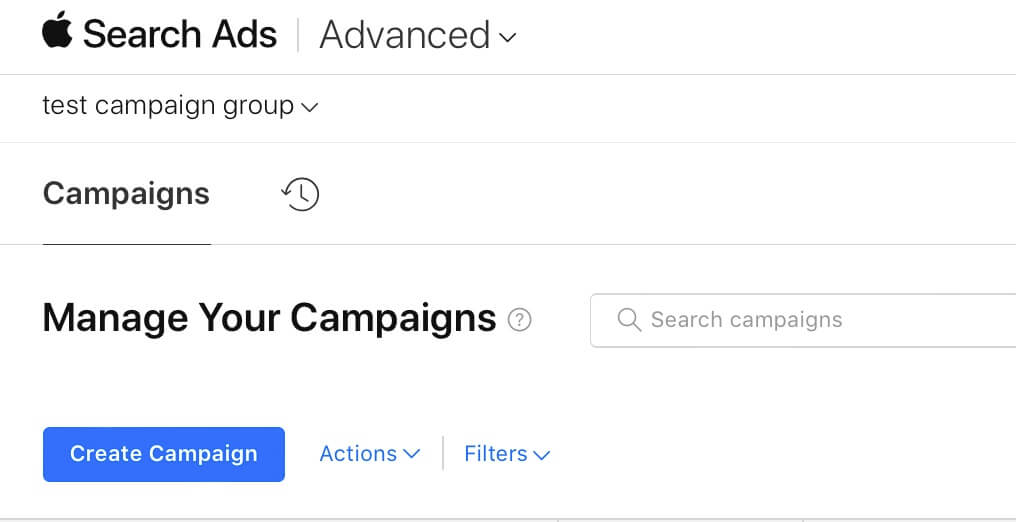
Login to your Apple Search Ads account and make sure you are on the "Advanced" page, you can choose that in the top left area of the page.
Setting up the primary campaign
- You'll be greeted with the below screen. Click on "Create Campaign"
- Select your app in the "Choose an app" input and click on "Search Results" then choose countries as discussed earlier, then click on "Continue".
- You'll be presented with a screen where you'll create an ad group and keywords. Type a campaign name and enter the daily budget that you've decided for the primary campaign (for example 80% of your total daily budget).
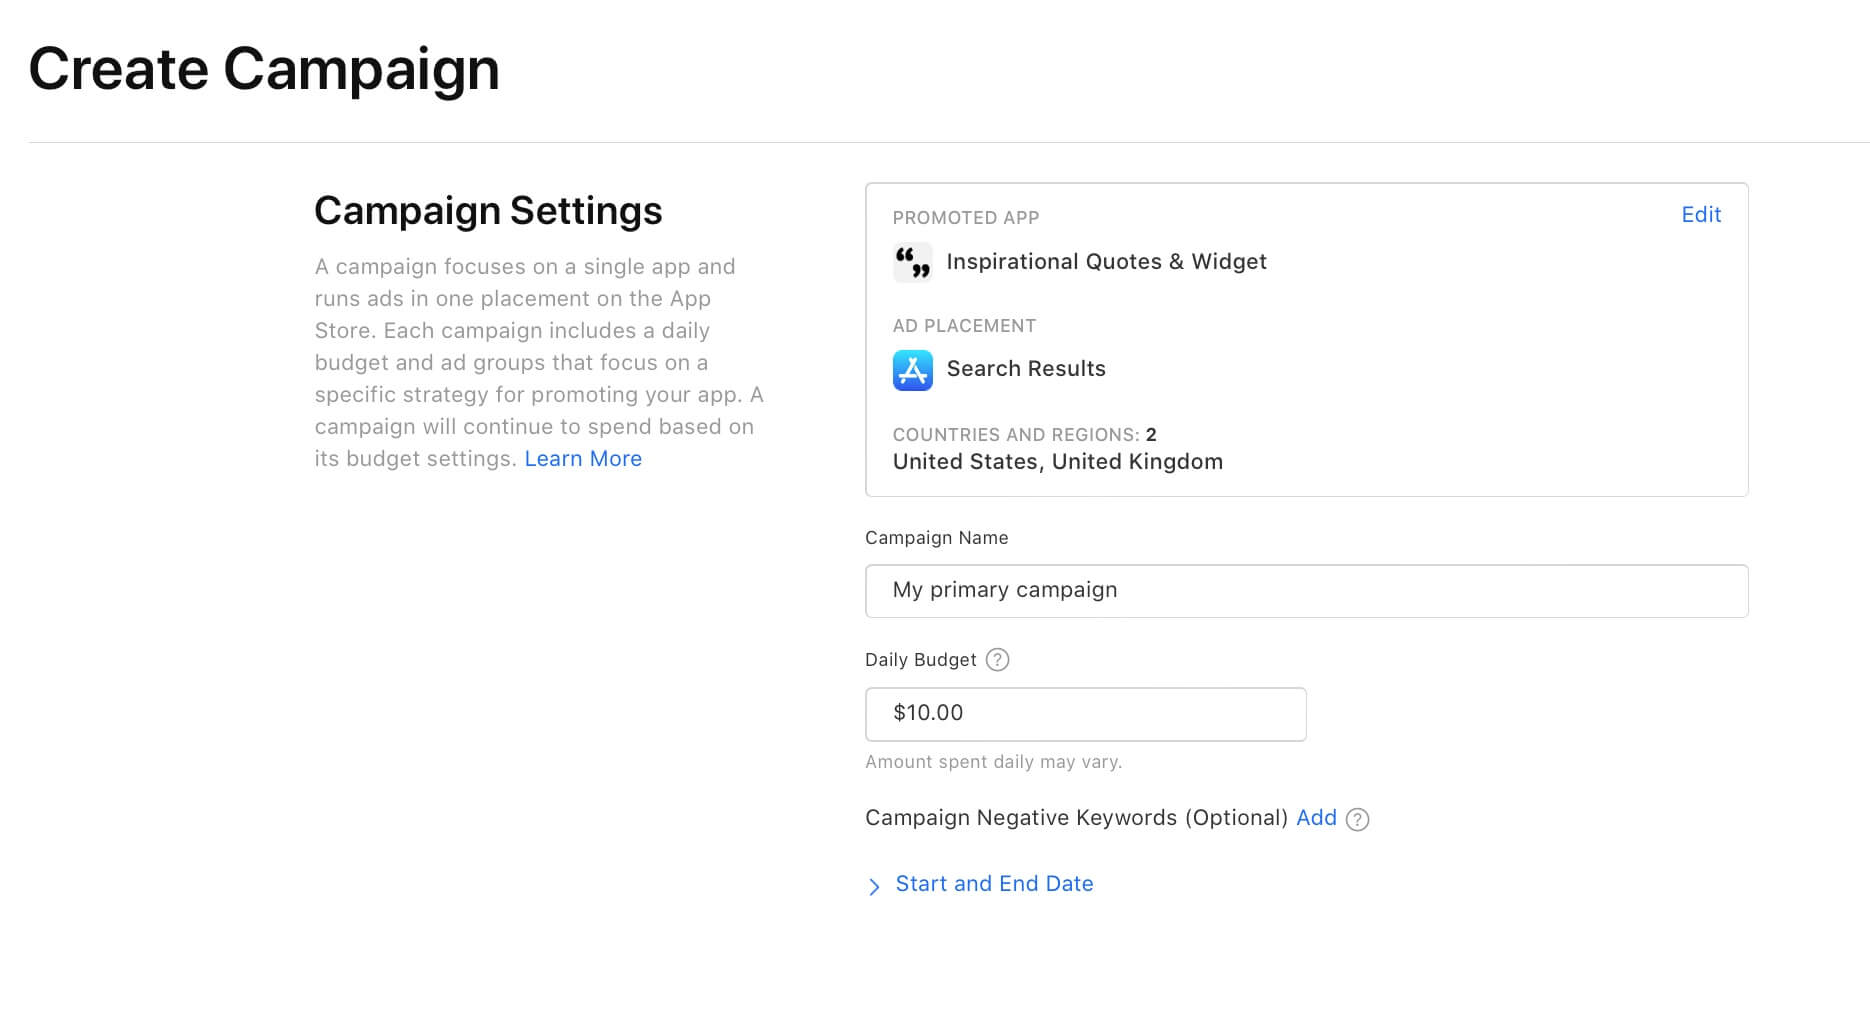
My suggestion is to not set an end date, because you can always pause a campaign whenever you want to stop your campaign and its associated spending. Choosing an end date may have unexpected behavior. You can learn more about this in the documentation
-
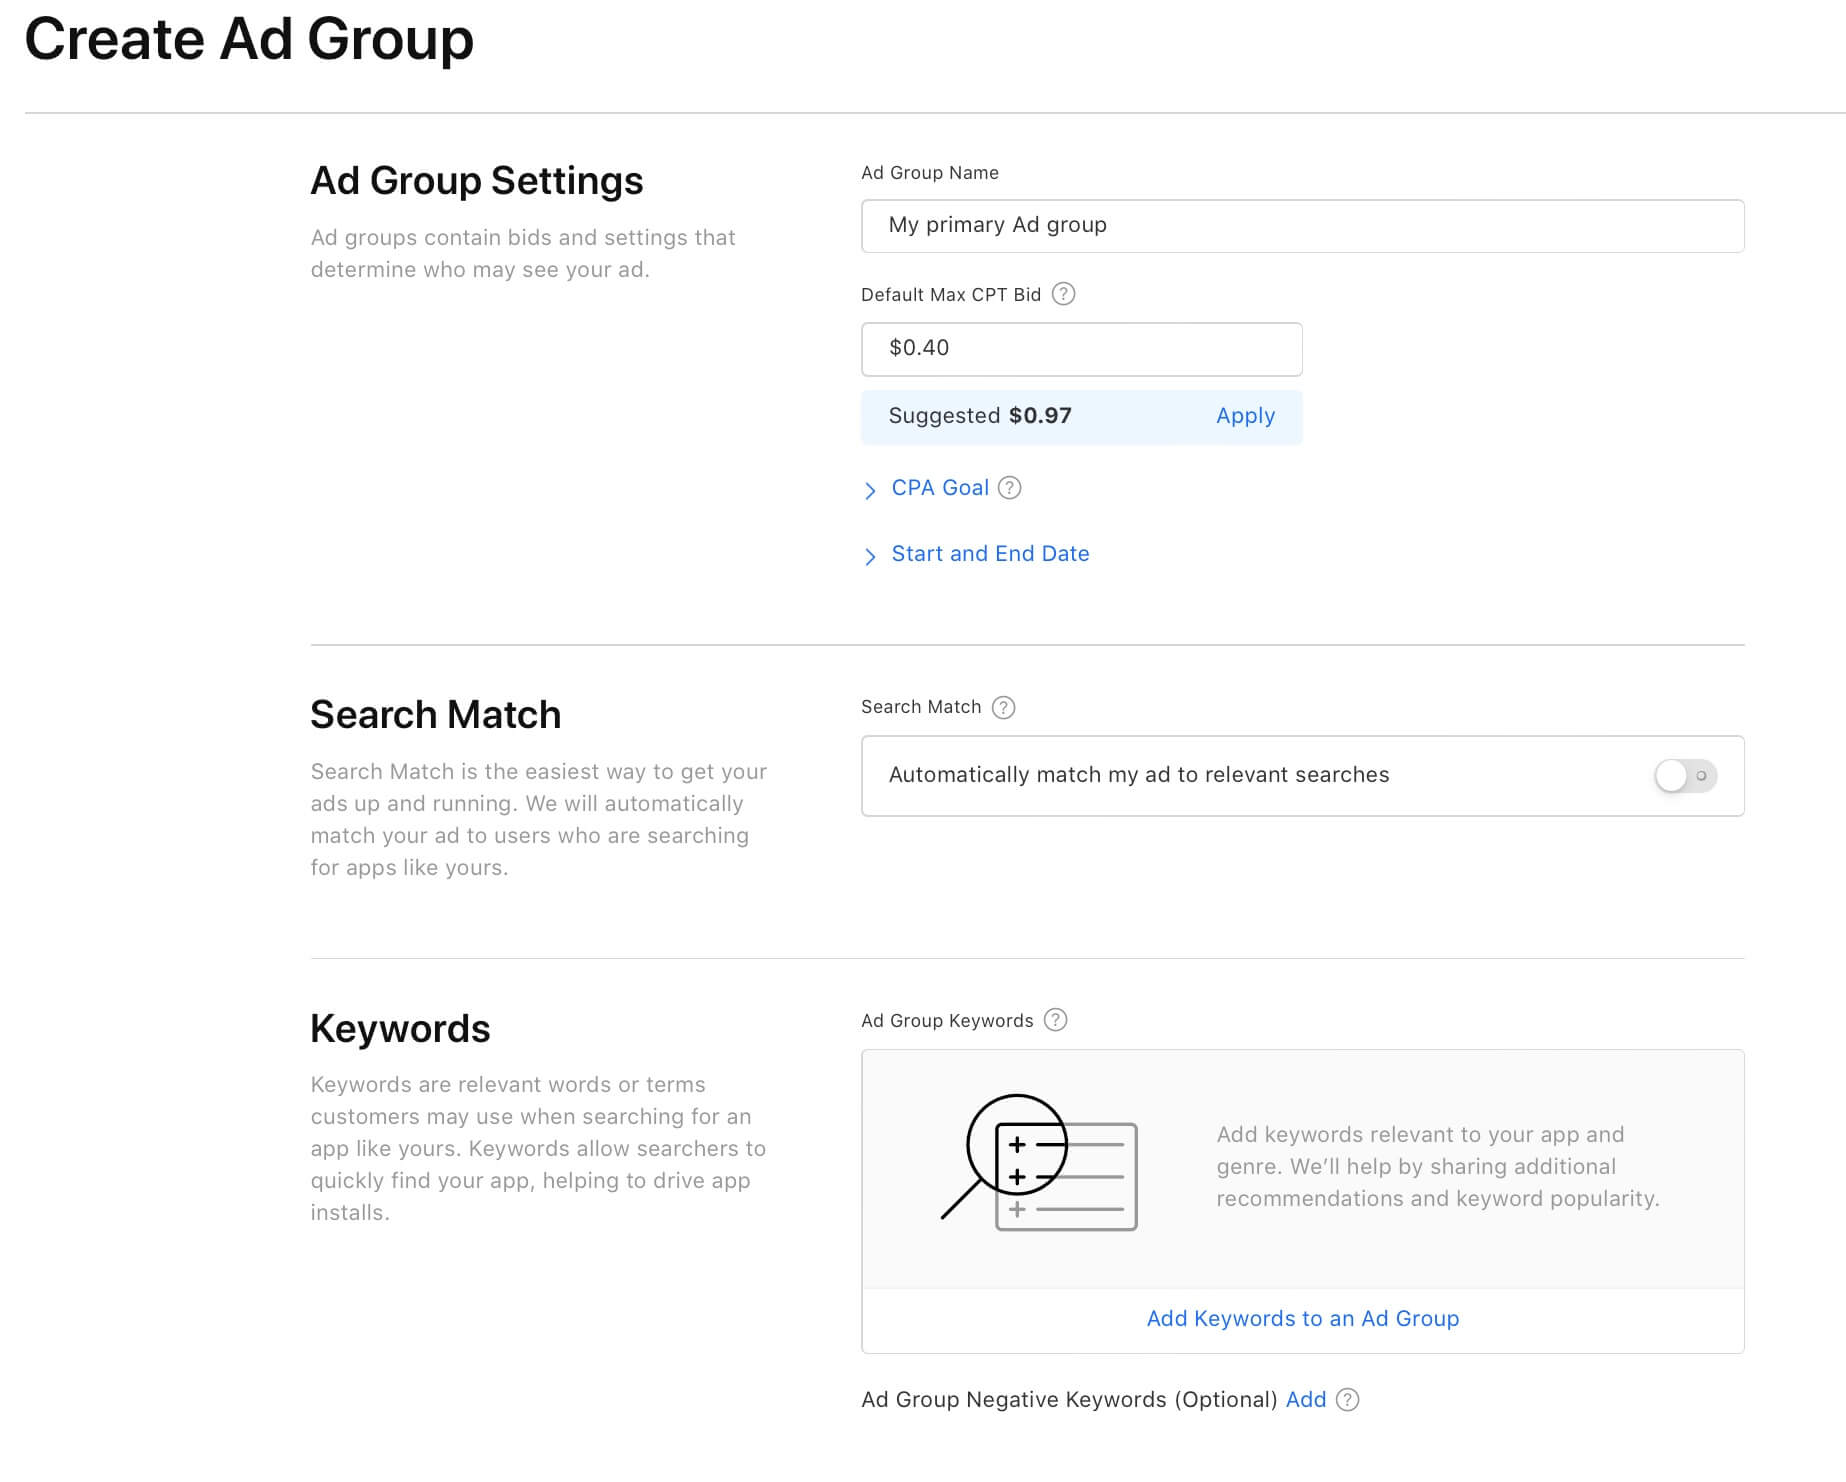
In the same screen under "Create Ad Group", type an ad group name.
-
There is an important field that you need to fill in, which is "Default Max CPT Bid". You might have noticed Apple already generated a suggested value. However, we will not be using this value. Instead, we enter a lower value. I usually enter half the suggested value. The reason is that we want to find out a minimum base value where you start getting impressions in ASA for your app in those countries. We can always increase the value later, so it's better to start low.
-
Leave the CPA goal empty as it is not ideal for our use case. If some popular keywords from your list perform badly for your app, potentially good keywords may not even get any impressions. As we already set the daily budget above, leave the CPA Goal empty. The same goes for Start and End dates. If you notice, the theme here is that we control the campaigns and ad groups by pausing and re-enabling them whenever necessary.
-
A very important gotcha here is "Search Match" which is enabled by default. You should turn it OFF for both the primary and discovery campaigns. Search Match is similar to ASA Basic which lets Apple show your ad for any keyword from your metadata, description, and algorithm. We already have a mechanism to find new keywords in the Discovery campaign, so we do not need this functionality. Another reason is, if you enable "Search Match", you can get unrelated keywords for your app that are going to eat up the budget without giving good results.
-
Now it's time to add the keywords you've gathered earlier to the ad group. Click on "Add Keywords to an Ad group". A new screen shows up that allows us to add our pre-gathered keywords.
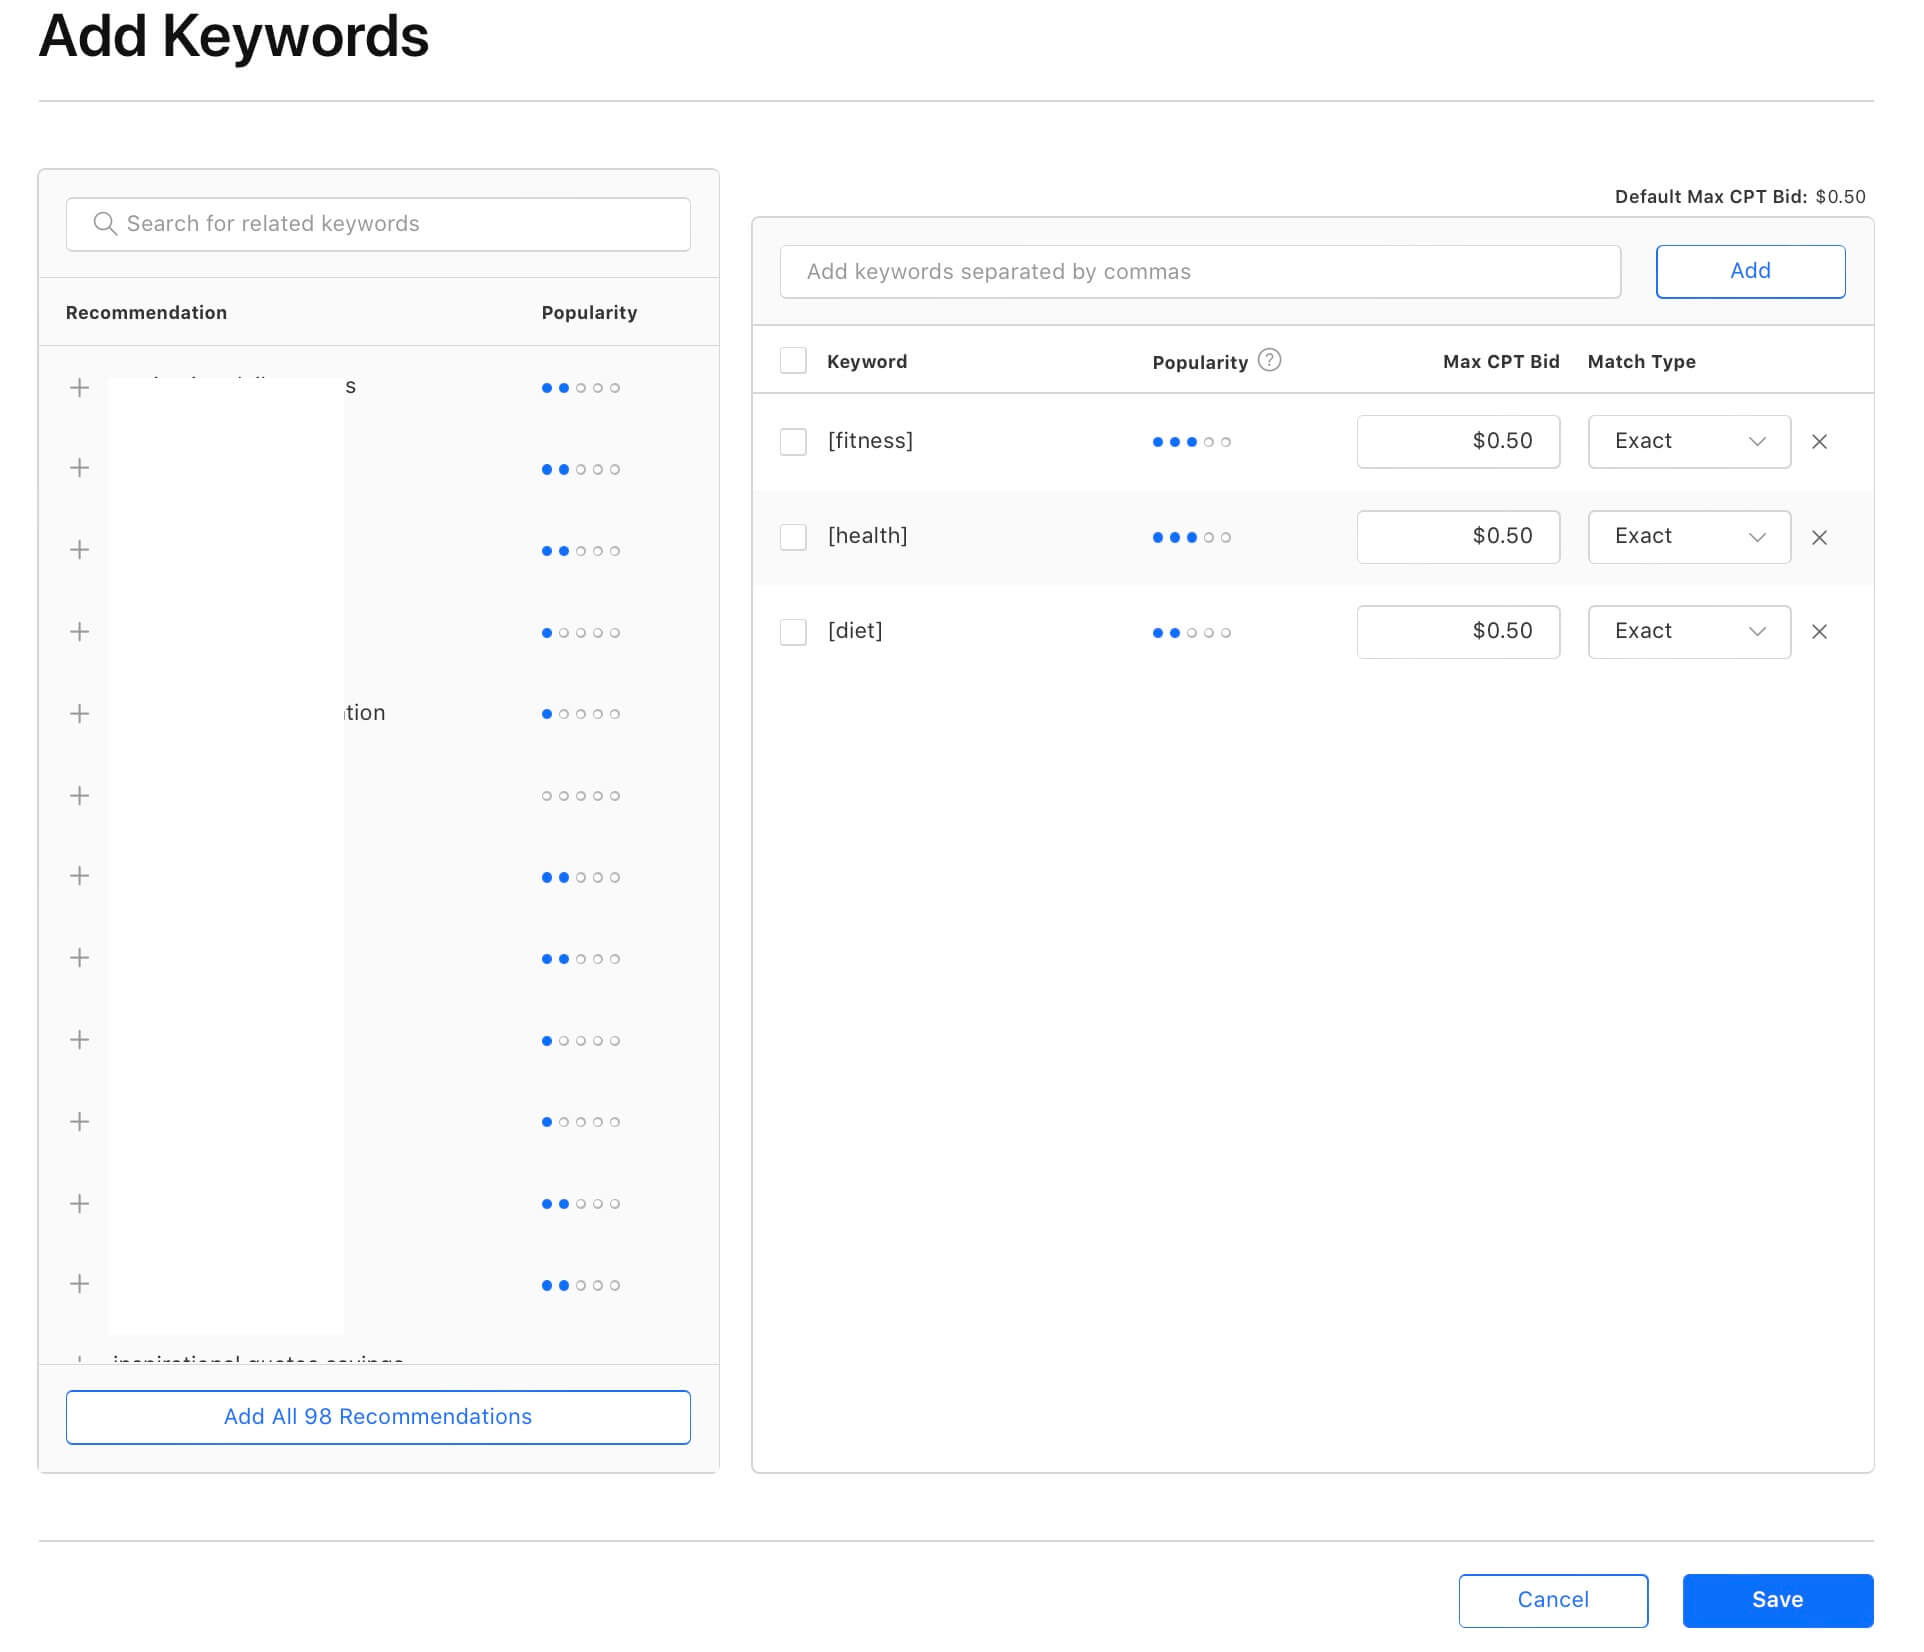
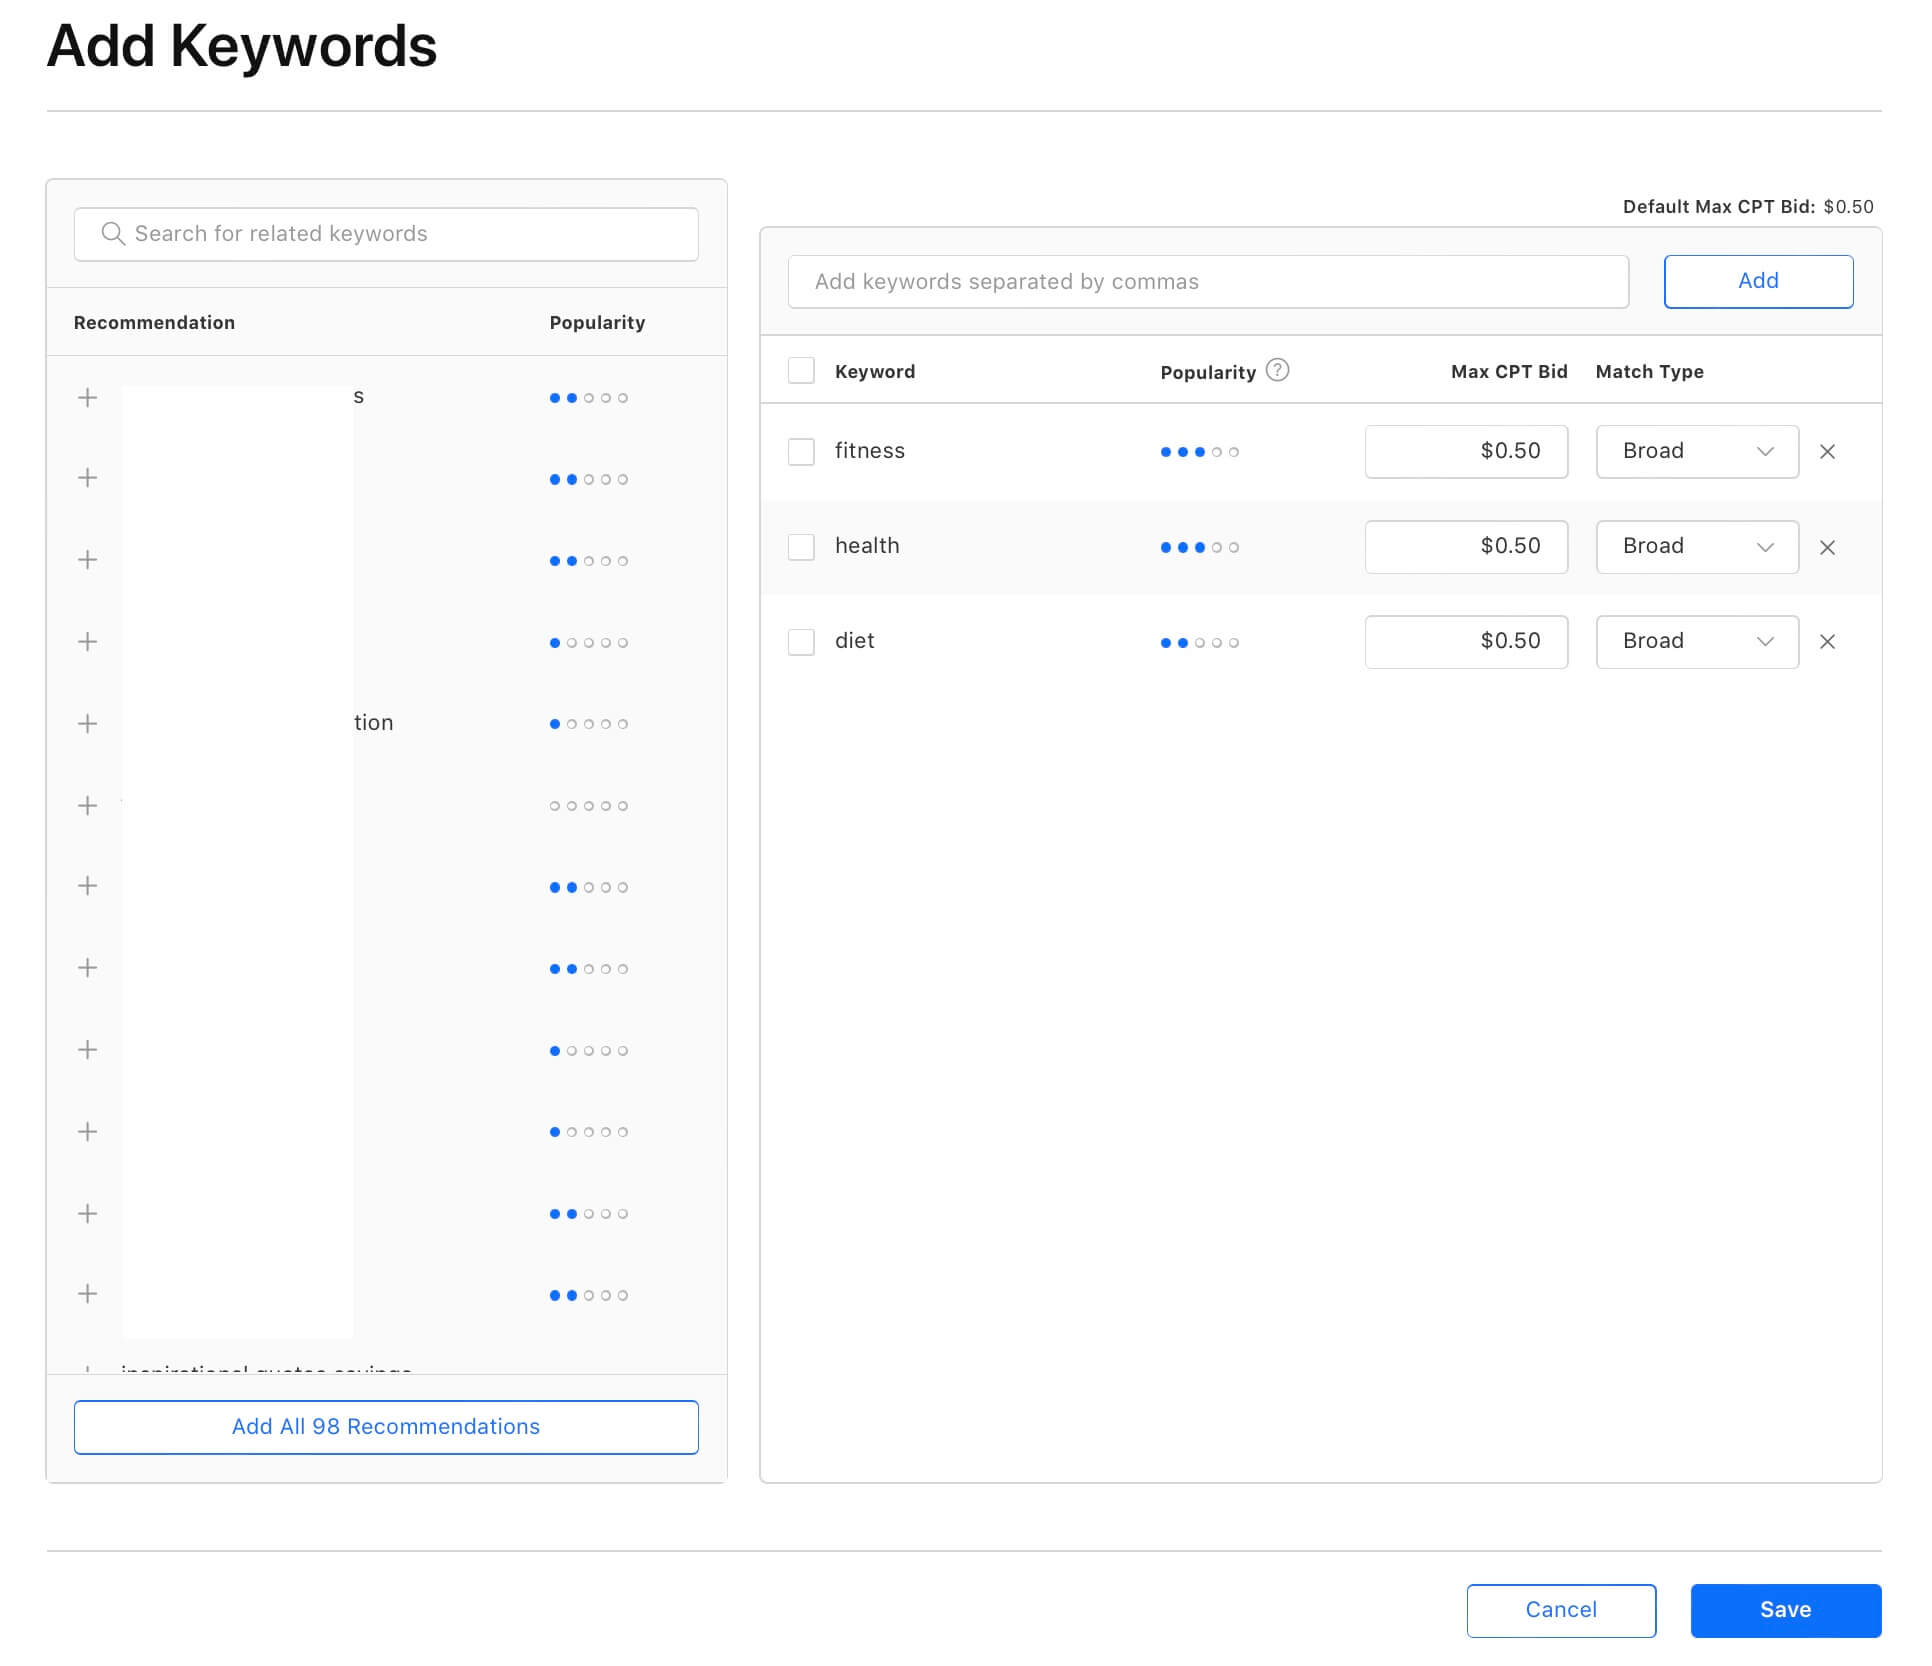
For this guide's sake, let's assume you've gathered three keywords "fitness", "health" and "diet". In the real world, you should have way more than three keywords, with as many relevant keywords as possible, including a combination of keywords.
Enter your pre-gathered keywords in the input field that says "Add keywords separated by commas", then click on "Add".
As you can see in the screenshot, you should also go through Apple's suggested keywords from the left panel where the blue dots indicate popularity. Click on the "+" symbol on any keyword you find relevant for your app that is not in your pre-gathered list. You should also add these new keywords to your existing pre-gathered list from your text file.
Change the "Match Type" for all keywords to "Exact", then click on "Save".
- Audience section
In this section, you have the option to filter the users based on their device type, gender, age, and customer type like existing users, and scheduling based on a certain timeframe.
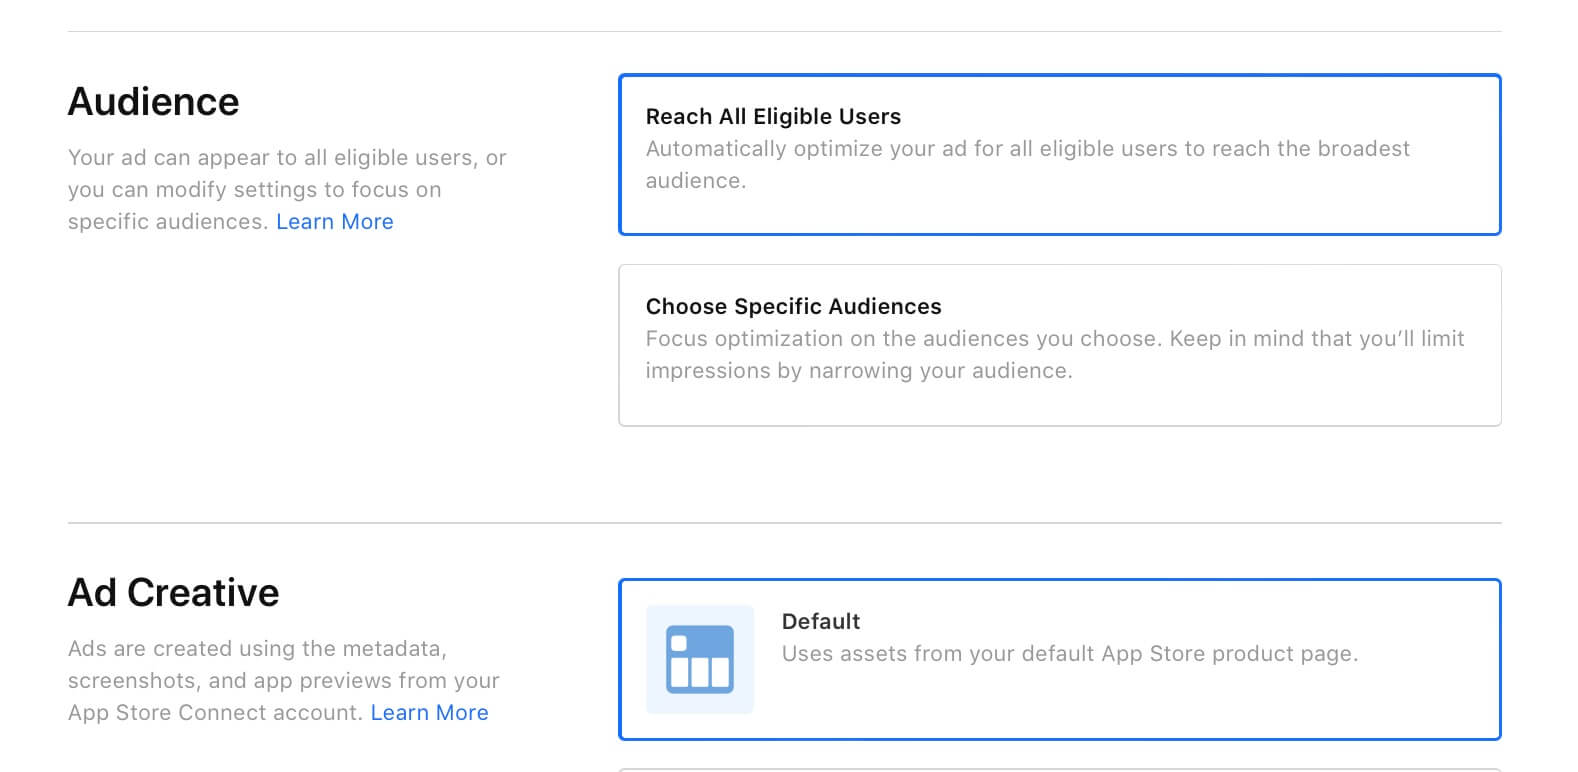
Unless you have a strong reason, you should leave the default "Reach All Eligible Users". For example, if your app is not usable in an iPad, you can choose "iPhone only" under the Devices filter.
I strongly advise that you should NOT filter to certain ages, gender, locations, etc. because this type of targeting comes under privacy policies, where you essentially discard a significant number of potential users who opted out of ad targeting in their device. This might be a debatable statement, but usually the users who are most likely to subscribe are also the ones who opt out of ad targeting on their device.
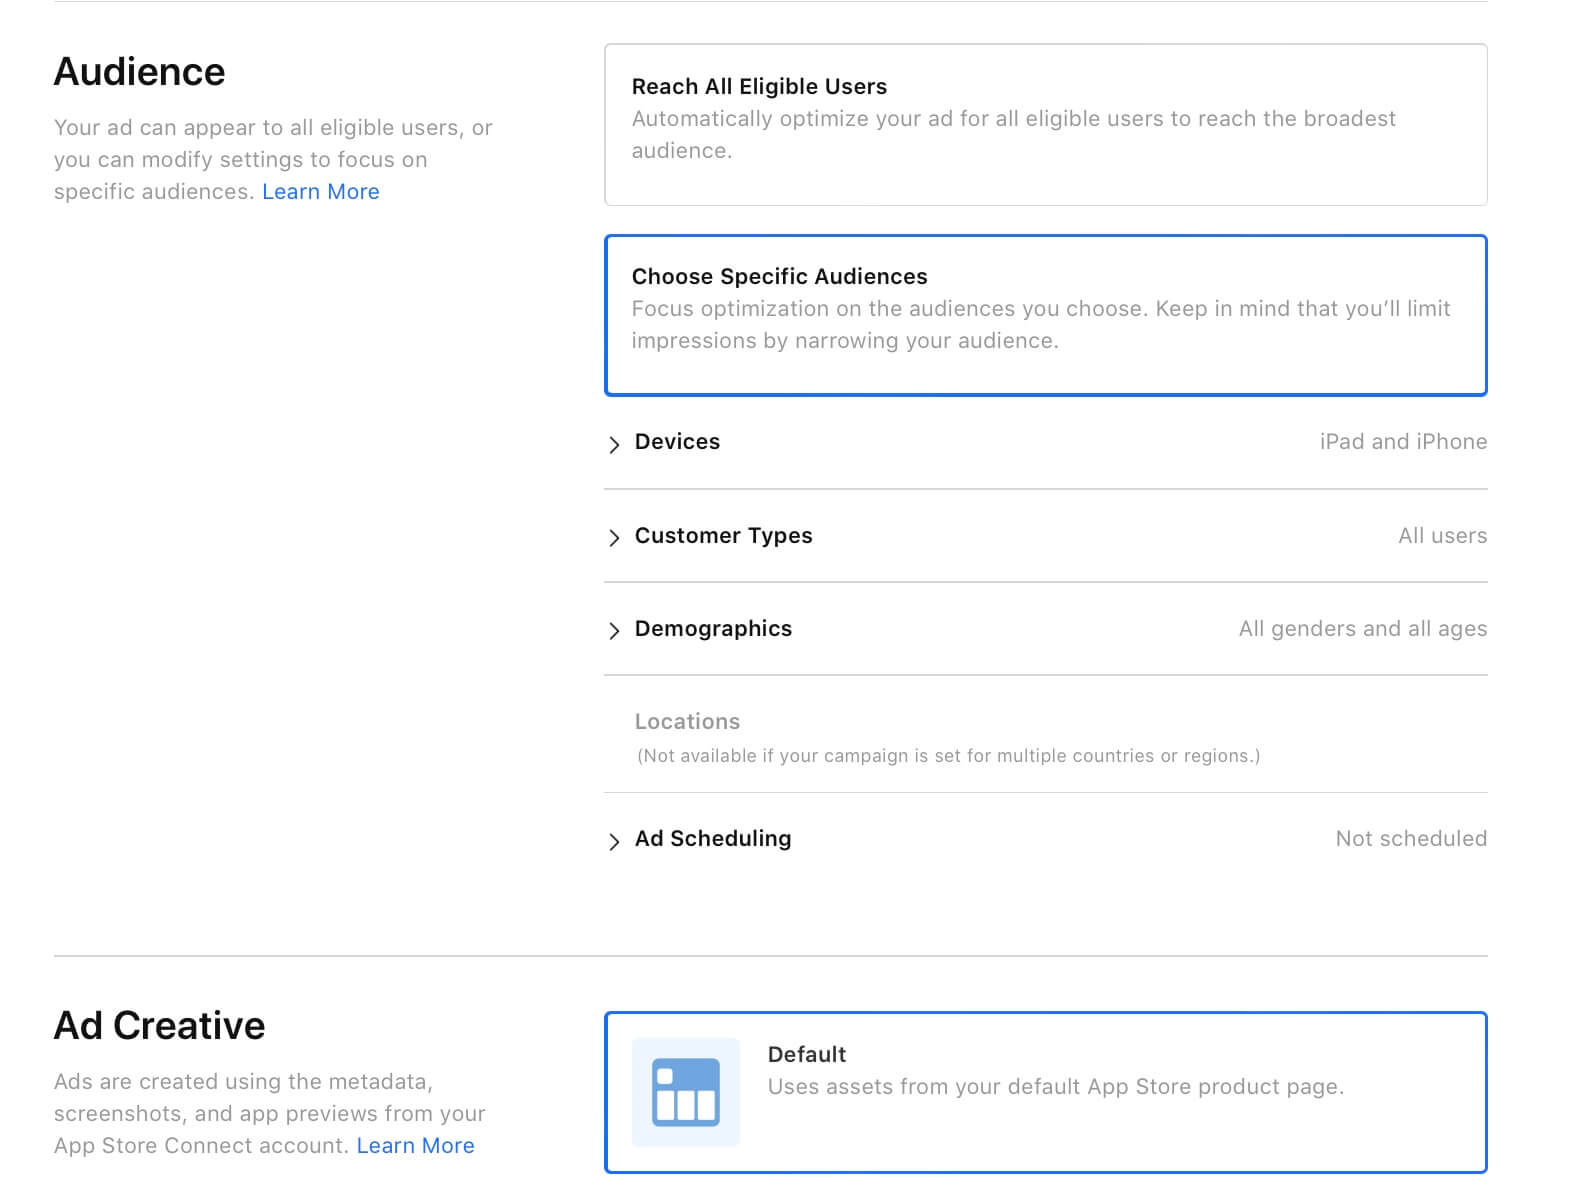
The only rare scenarios where you should filter the age, gender, location, etc., are if your app is location-based (like a New York City-based app), gender-based (like a women's health app), or age-based (like an app for college students). In these rare scenarios, filtering out certain demographics is better despite the above drawbacks.
-
You can leave the default "Ad Creative", which is essentially your main app page.
-
Finally, click on "Create Campaign"
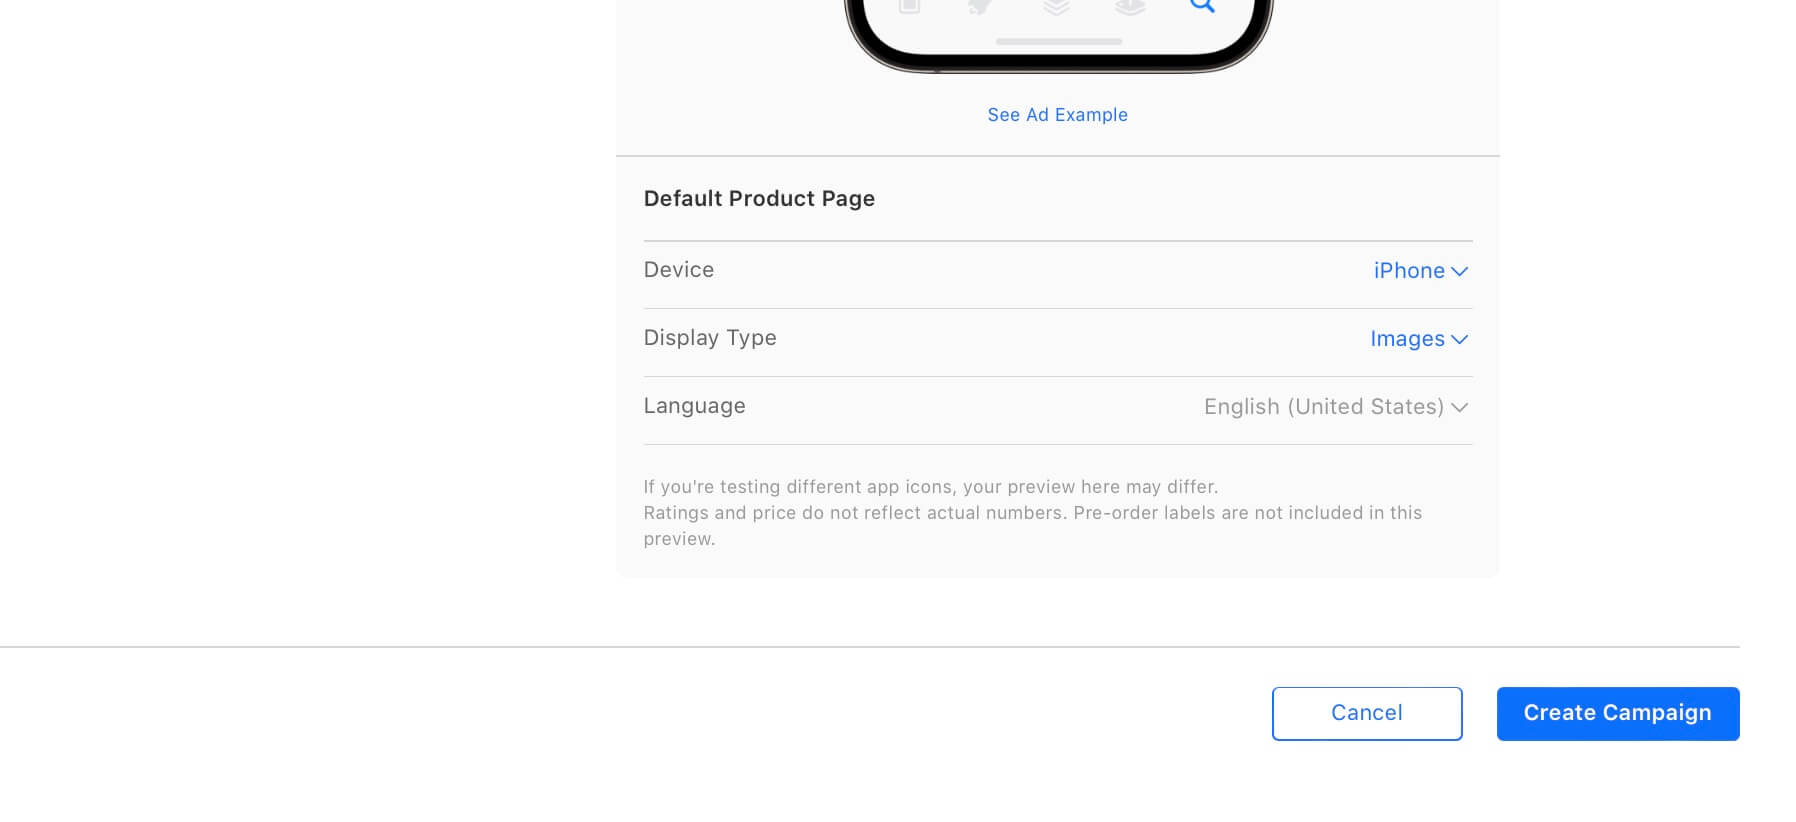
Setting up the discovery campaign
I recommend setting this up now, even if you don't plan to launch a discovery campaign. You can just pause the campaign after you've launched it because the discovery campaign is closely associated with the above primary campaign. It's better to set this up now, in case you ever want to use the discovery campaign. In that case, you can just enable the discovery campaign later.
-
Same as above.
-
Same as above.
-
Same as above, except change the daily amount you've decided for the Discovery campaign (for example 20% of your total daily budget). You should also type a different campaign name other than the previously entered primary campaign name.
-
Same as above, except choose a different ad group name for readability purposes.
-
Same as above.
-
Same as above.
-
Same as above.
-
The process is similar to the above, except there are two changes you need to perform here.
- You should still add all of your gathered keywords from your text file. Additionally, all the keywords you've added should be of match type "Broad" in this discovery campaign. Click on "Save".
- Click on the "Add" button next to the text that says "Ad Group Negative Keywords (Optional)". You can find this button in "Keywords" section.
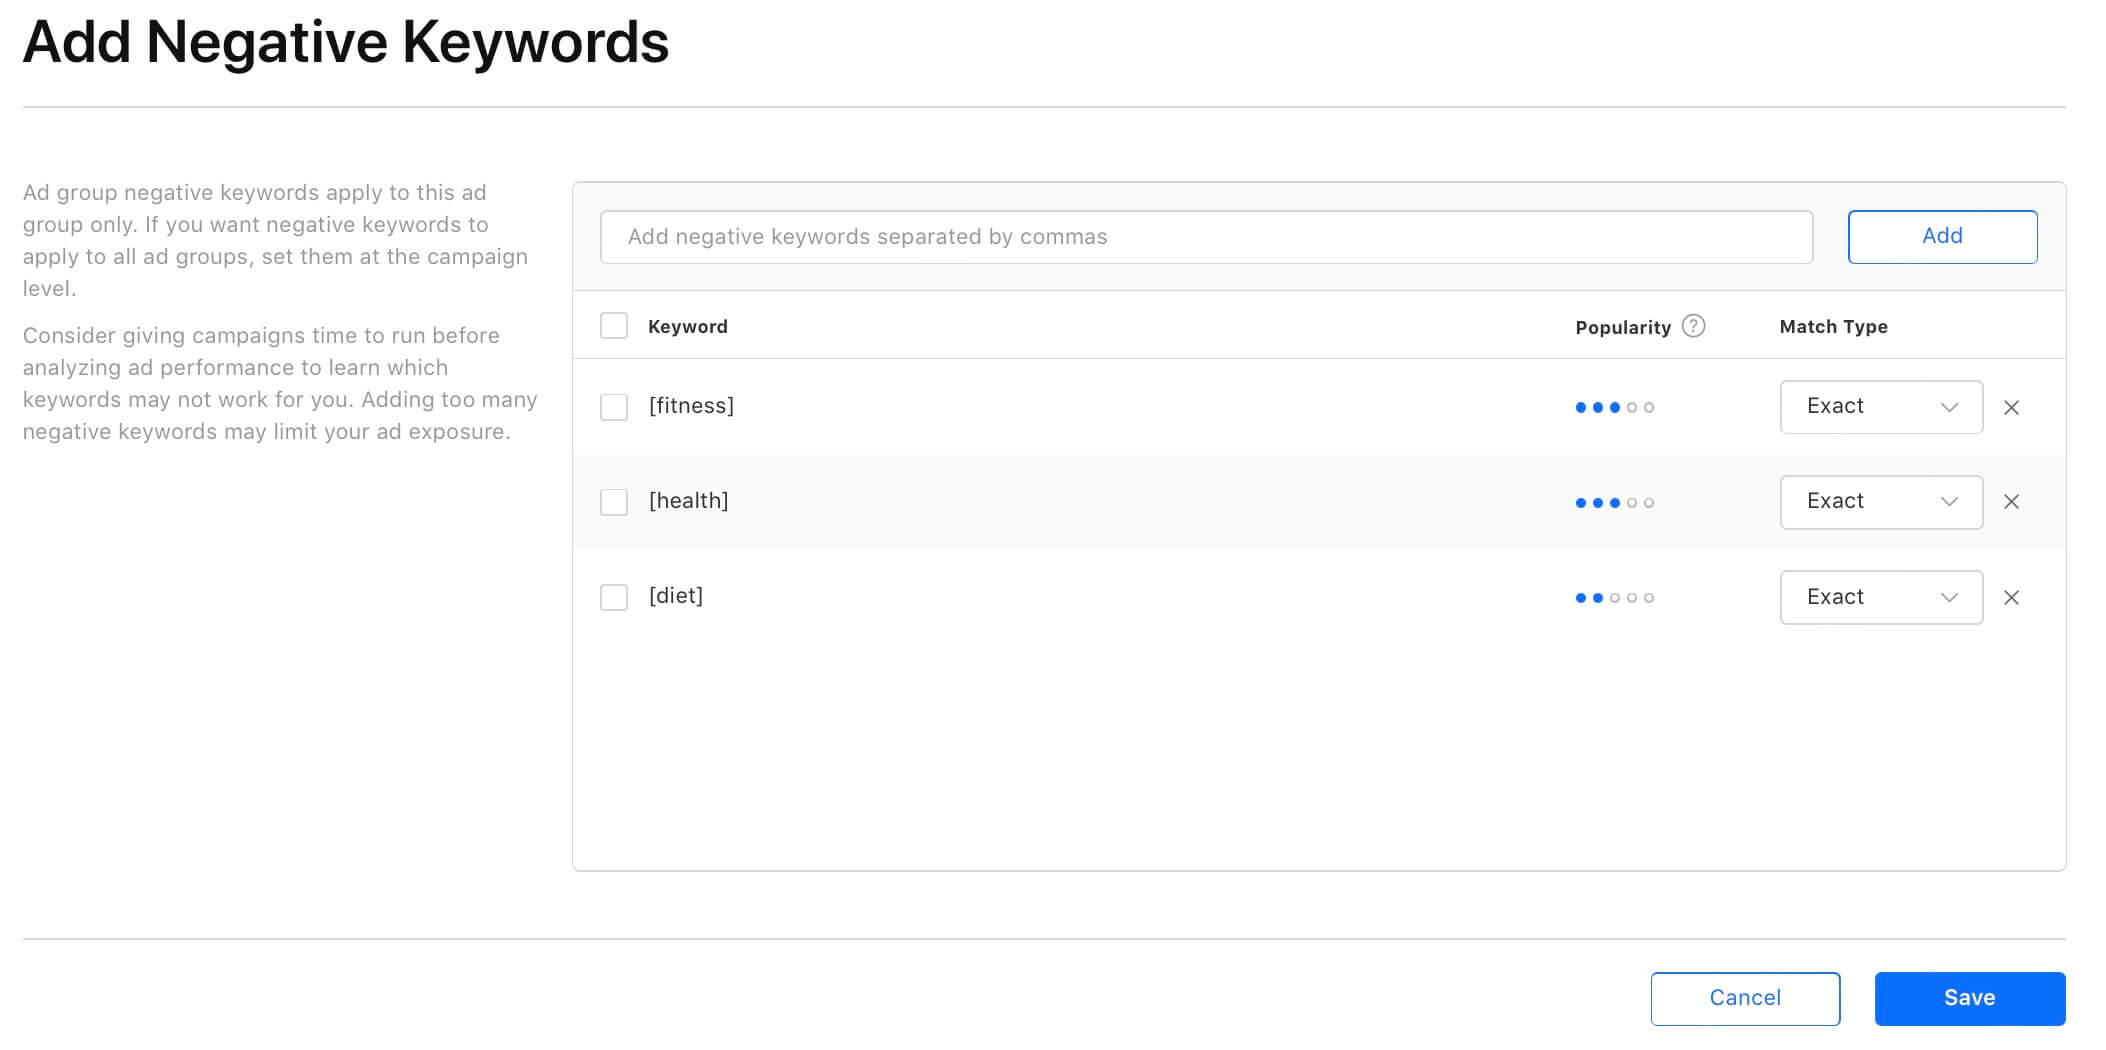
From the new screen where it says "Add Negative Keywords", add all your keywords from your text file and the match type should be "Exact" for all keywords. Click on "Save".
-
Same as above.
-
Same as above.
-
Same as above.
That's it. You've completed an initial decent setup. Now it's a good time to take a break and check back after a few hours or the next day.
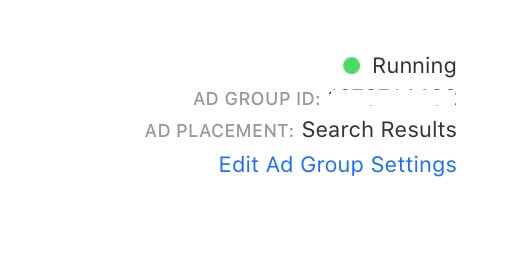
After some time, one of two things will happen, either you've some decent taps and installs or you don't have any taps or installs for your campaigns. If you don't have decent installs or taps for a particular campaign, just increase the "Default max CPT" value from step 5 by clicking on a campaign and then clicking on "Edit Ad Group Settings" on the right as shown below. Repeat this process until your daily budget is totally spent for a particular day.
The objective here is to find the lowest range of bid amount that you can rely on for your campaigns throughout the lifecycle of your app. This is a one-time process that can give you a significant advantage based on real-world feedback.
If you are already using our platform SAO, the optimizer AI takes care of this process regardless if it's a new campaign or an existing campaign.
If you are reaching uncomfortable and unsustainable bid amounts while not getting enough taps and installs, you can research and include more relevant keywords and/or add more "Tier 1" countries.
Optimizing the campaigns
There is a possibility that you might be getting some installs and some revenue but your cost is also too high because of your category or increased competition.
You must employ some kind of frequent and constant optimization for your keyword bids either manually or using an advanced automated AI-based optimization like our platform SAO in order to reduce a significant amount of cost while retaining as results as possible. This process should be deployed throughout the lifecycle of your campaign as long as you are using Apple Search Ads.
For example, let's assume your daily budget is x and you are getting y number of installs and z amount of revenue from the Apple Search Ads campaigns per day. Your objective should be to reduce the value of x while still retaining the y and z values as much as possible. The only way to do this is frequent and constant optimization for the bid amounts at the keyword level either manually or using a smart and much more sophisticated AI-based automated optimization like our platform SAO.
If you choose to optimize manually, you should be constantly adjusting the bids around the base level for each keyword based on its performance. At any point in time of your campaigns, there always be some keywords that give you good results and some keywords that give you bad performance temporarily or consistently.
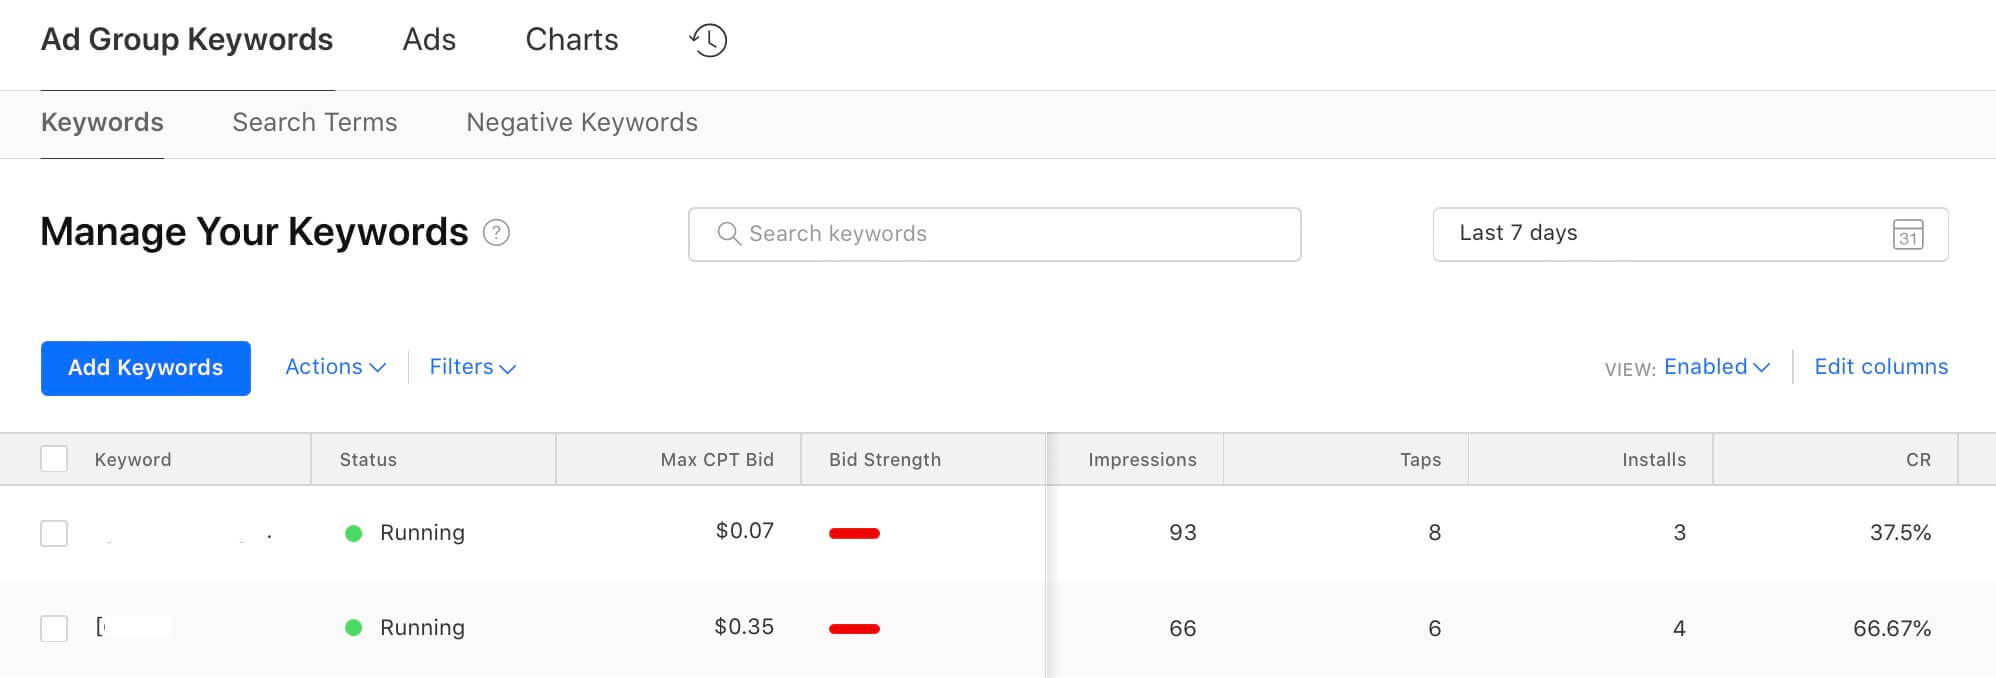
For example, below is a screenshot of our platform SAO's optimizer AI where it reduced a badly performing keyword's bid temporarily based on several factors. If you choose to optimize manually every day, you can try to identify bad-performing keywords based on your ad spending for that particular keyword constantly and frequently.
This is one of the main reasons why we aim to have as many relevant keywords as possible. Temporarily suppressing a few bad keywords shouldn't impact your ASA campaigns because other keywords can fill the gap.
Finally, a reliable way to make your Apple Search Ads work for you is constantly monitoring and improving your conversion rate, which reduces your costs significantly while retaining results for the relevant keywords as much as possible.
SAO AI optimizes this metric for your campaigns in an automated interval non-stop. An AI along with a well-designed machine learning model is perfect for performing repetitive manual tasks when a correct set of metrics and outcomes can be calculated.
Hopefully, you got some value out of this guide. If your ASA campaigns are consistently driving revenue, you can easily scale by increasing daily budget, adding more countries, and localizing for new countries, hence more keywords.
Search Ads Optimization (SAO) AI optimizes and automates your keyword bid management so you can scale Revenue/ROAS, reduce cost per acquisition, and minimize wasted ad spend for your Apple Search Ads campaigns. Learn more...
This article is part of a much more detailed free ebook for Apple Search Ads Advanced. I recommend you get the free download where you can learn more about ROAS, revenue tracking, reducing the cost of Apple Search Ads, and many more tips and tricks.

